




Last Updated: October 23, 2026
Quick Summary
To get your hoodie chest size right, measure around the fullest part of your chest, then measure the hoodie flat from underarm seam to underarm seam and double it. Compare that doubled figure with your body chest circumference, never the flat width alone.
- Keep the tape level all the way round, since a tape that dips at the back reads 2-4cm short.
- Self-measured chest readings typically run 1-3cm small, so use a mirror check.
- Aim for 8-12cm of ease for a regular fit and 18-25cm for oversized.
- Size up for oversized hoodies and size down for a closer fit when between sizes.
- Convert inches to centimetres by multiplying by 2.54 before comparing any chart.
Table of Contents
- Chest Circumference vs Chest Width: The Mix-Up That Ruins Sizing
- How to Measure Yourself for a Hoodie
- Hoodie Measurements Laid Flat: Getting the Garment Number Right
- Reading a Hoodie Size Chart Without Getting Burned
- Oversized Hoodie Fit Guide: How Much Room You Actually Want
- When You Fall Between Sizes or the Chart Looks Wrong
- Conclusion
- Frequently Asked Questions
Chest Circumference vs Chest Width: The Mix-Up That Ruins Sizing
Most sizing mistakes start with one wrong number. You measure your chest, check the hoodie chest size on a size chart, and order.
Here's the gap that trips people up: a hoodie's flat chest width is only the front panel. To compare it fairly with your body, you double it.
This guide from Cali Studios walks through measuring your body, measuring a hoodie, and matching the two without guesswork.
How to Measure Yourself for a Hoodie
Start with your body, not a garment. You need two numbers: chest circumference and, ideally, waist. A soft measuring tape is all the kit required, plus a mirror or a second pair of hands for a reading you can trust twice.
Stand straight with your arms relaxed at your sides. Don't puff your chest out or suck it in, measure the body you actually have on a normal day.
Where the Tape Should Sit
Wrap the tape around the fullest part of your chest, usually level with the nipple line or just below the armpits. Keep the tape horizontal all the way round.
Keep it snug but not tight. You should be able to slide one finger under the tape without the tape lifting away from your body. Breathe normally. If you're measuring a hoodie for layering over other clothes, measure over a t-shirt, not bare skin, and note that you did so.
A Repeatable Step-by-Step Procedure
Most measurement errors come from inconsistency, not the tape. Follow the same sequence every time:
- Stand with your back against a wall or door frame. This keeps your posture upright and stops you leaning forward to read the tape.
- Find the fullest point of your chest by running the tape up and down the front until it sits at the widest reading. Mark that height mentally.
- Wrap the tape around at that height, keeping the zero end at the front centre of your chest.
- Check the tape is level at the back by looking in a mirror or asking someone to check. The back of the tape should sit at the same height as the front.
- Exhale normally and read the number at the point where the tape meets its zero end. Don't hold your breath and don't pull the tape tight to round the number down.
- Record the figure in centimetres to the nearest half-centimetre.
- Repeat the whole procedure once more, from step 1, without looking at your first number.
If the two readings differ by more than 1cm, take a third and use the middle figure. A 2cm gap usually means the tape moved off level or your posture changed. Small errors compound against a size chart, a 2cm body error can push you across a size boundary.
Recording Your Numbers
Write the number down in centimetres somewhere you'll find it again, a phone note works fine. Record chest first, then waist at the narrowest point, then hips if you want a fuller picture.
If you're measuring without help, the mirror check at step 4 is the single most useful habit. Self-measured chest readings typically run 1-3cm small because the tape drifts down at the back unnoticed.
A Worked Example
Suppose your two chest readings are 101cm and 103cm. They differ by 2cm, so take a third: 102cm. Use 102cm as your body chest circumference. If a size chart lists a hoodie's flat chest width as 56cm, double it to 112cm, a 10cm difference, which sits in the regular-fit band. A 60cm flat width doubles to 120cm, giving 18cm of ease and moving into relaxed or oversized territory.
Hoodie Measurements Laid Flat: Getting the Garment Number Right
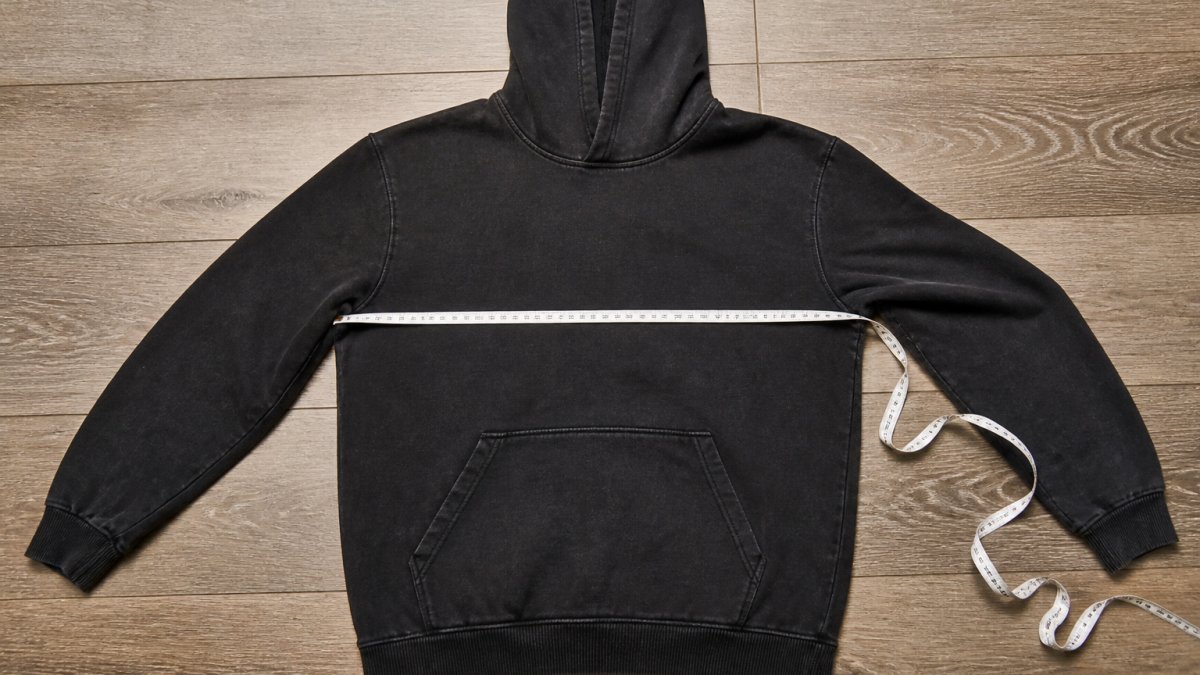
Lay the hoodie face up on a flat surface and smooth out the sides so the fabric isn't bunched. Zip it closed if it has a zip. You want the garment sitting as flat and square as it would on a hanger.
Underarm to Underarm and Doubling It
Place the tape at the seam where the sleeve meets the body on one side and run it straight across to the matching seam.
Don't stretch the fabric. Don't let the tape sag. Read the number where the tape meets the far seam.
Now double it. That doubled figure is the hoodie's approximate chest circumference. This is the number you compare with your body measurement.
For a drop shoulder hoodie, the underarm seam sits further down the arm than on a standard cut. If you're unsure how drop shoulder construction changes the fit, what a drop shoulder hoodie fit involves explains the shape before you start reading numbers.
Reading a Hoodie Size Chart Without Getting Burned
A hoodie size chart is a table of garment measurements, not body measurements, unless it says otherwise. That single distinction causes most returns.
Check the header. "Chest" with figures like 56cm or 60cm almost certainly means flat widths; "chest circumference" with 112cm or 120cm means doubled.
Then line up three things: your chest circumference, the chart's chest figure, and the intended fit. A chart entry of 112cm against your 100cm chest leaves 12cm of ease. That's a close, regular fit. A 120cm entry leaves 20cm, which reads as relaxed or oversized.
If you want real examples to compare against, our oversized hoodie picks with fit and fabric notes show how different garments measure up against their charts.
Oversized Hoodie Fit Guide: How Much Room You Actually Want
Oversized doesn't mean shapeless, it means a deliberate, measurable amount of extra room.
As a working rule, aim for these ease figures between your chest circumference and the hoodie's doubled chest width:
| Fit | Extra room over your chest | What it looks like |
|---|---|---|
| Regular | 8-12cm | Sits close, follows your shape |
| Relaxed | 12-18cm | Some drape, easy to layer |
| Oversized | 18-25cm | Clear drop, roomy through the body |
| Very oversized | 25cm+ | Deliberately boxy, size up again |
Drop shoulder construction adds visual width without adding much to the chest figure, so a drop shoulder hoodie can look bigger than its measurements suggest. That's the design working as intended.
Our own hoodies run oversized by design. The Eagle Hoodie is cut with dropped shoulders and a relaxed oversized fit in cotton-poly fleece, and our model at 5ft 10 wears an XL. If you want a broader walkthrough of how much room to aim for, our men's oversized clothing sizing guide goes deeper on fit across the range.

When You Fall Between Sizes or the Chart Looks Wrong
Between sizes? Size up for oversized hoodies and size down for a closer fit. Fabric weight decides the rest. A heavy 500GSM or 600GSM cotton-poly blend holds its shape and drapes with weight, so extra room reads as intentional.
That rule only works when the chart gives you something usable. Many don't. Here is how to handle the common failures.
When the Chart Lists Only Garment Width
Some charts give a single flat chest width with no circumference figure and no fit guidance. Don't guess from the label. Double the flat width to get an approximate garment circumference, then compare it with your body chest circumference to work out the ease. A 54cm flat width becomes 108cm. Against a 100cm chest that's 8cm of ease, a close regular fit.
When the Chart Uses Different Measurement Points
Charts vary in where they measure: some at the underarm seam, others 2.5cm below the armhole or at a stated distance from the shoulder. A chart measuring lower down usually gives a larger figure for the same garment, because the body widens below the armpit. If the chart states its measurement point, use that; if it doesn't, treat the figure as approximate and lean on a garment you already own as your benchmark.
When Chest and Waist Recommendations Conflict
A common pattern is a chart that puts you in one size by chest and another by waist. For hoodies, chest usually wins: they're cut to hang from the shoulders and chest, and the hem is typically loose or ribbed with stretch, so waist fit is more forgiving. If the chest recommendation is smaller than the waist recommendation, take the chest size and accept a looser hem.
When Units Are Missing or Mixed
Watch the units too. Some charts use inches, most use centimetres. Convert before comparing: multiply inches by 2.54. A 22-inch flat width is 55.9cm, which doubles to about 112cm. If a chart mixes units across rows, convert every figure to centimetres and write the converted numbers beside the originals before comparing anything.
A Decision Process for a Bad Chart
When a size chart is incomplete, inconsistent, or simply doesn't give you enough to work with, work through this sequence:
- Measure a hoodie you already own and like, laid flat, underarm to underarm. Double it.
- Compare that doubled figure with your body chest circumference to find the ease you already find comfortable. That is your personal benchmark.
- Find the new garment's flat chest width, double it, and compare the ease with your benchmark.
- If the new garment's ease is within about 2cm of your benchmark, the size is likely right.
- If it's more than 4cm away in either direction, move up or down a size and recheck.
- If the chart still can't get you within 4cm, contact the retailer with your body chest circumference and ask for the flat chest width of the specific size. A retailer who can't answer that is a risk.
This turns a bad chart into a solvable problem rather than a coin flip, and gives you a record you can reuse for every future order from the same brand.
When a size chart simply doesn't give you enough to work with, our guide to finding streetwear that fits sets out a framework for choosing when the numbers fall short.
Conclusion
Sizing stops being a gamble once you measure both sides properly. Wrap the tape around the fullest part of your chest, lay the hoodie flat and measure underarm to underarm, then double it. Compare the two, check the ease against the fit you want, and order with confidence.
At Cali Studios, we cut our hoodies oversized with drop shoulders so the extra room is built in rather than guessed at. The Heavy Hoodie in Washed Black uses a 500GSM cotton-poly blend with a boxy fit, while the Washed Tiger Zip Hoodie runs oversized in plush sponge fleece.


Measure once, note the numbers, and shop the Heavy Hoodie in Washed Black with a figure you can trust.
Frequently Asked Questions
Should you measure hoodie chest width flat or around the body?
Both, but they answer different questions. Measuring around your body gives your chest circumference, which is what size charts are usually built on. Measuring a hoodie laid flat, underarm to underarm, gives the garment's chest width, and you double that to compare like for like. If you only do one, you can't tell whether the hoodie will actually fit. Do the body measurement first, then check the flat width of a hoodie you already own that fits well, and compare the two against the chart.
What does a 24-inch hoodie chest measurement mean?
A 24-inch figure is almost always the flat garment width, measured underarm to underarm with the hoodie lying flat. Doubled, that's a 48-inch chest circumference, which is a genuinely roomy fit. If a chart quotes 24 inches as your body chest, that's a different and much larger number. Always check whether the chart is stating body circumference or flat garment width before you order, because the gap between the two is roughly 10 to 15 cm on an oversized hoodie.
How much ease should a hoodie have around the chest?
For a regular fit, allow around 10 to 15 cm of ease over your body chest measurement. For an oversized or drop-shoulder hoodie, expect 20 cm or more. Ease is the difference between your body circumference and the garment's full chest circumference. A hoodie with no ease will pull across the back and ride up when you raise your arms. If you want the boxy, dropped-shoulder look, size for the shoulder seam position as well as the chest, since drop shoulders change where the sleeve starts.
How do you compare your chest measurement with a hoodie size chart?
Measure your chest at the fullest part, keep the tape level, and write the number down. Then check whether the chart lists body measurements or garment measurements. If it lists garment chest width flat, double it before comparing. If your number sits between two sizes, go up for an oversized fit and stay down for a regular one. Also check the sleeve length and garment length, because chest alone won't tell you if the hoodie is long enough in the body.

